Dockerfile
Dockerfile定义了容器内的环境配置,如网络端口映射和虚拟磁盘等。
示例:
# Use an official Python runtime as a parent image
FROM python:2.7-slim

# Set the working directory to /app
WORKDIR /app

# Copy the current directory contents into the container at /app
ADD . /app

# Install any needed packages specified in requirements.txt
RUN pip install -r requirements.txt

# Make port 80 available to the world outside this container
EXPOSE 80

# Define environment variable
ENV NAME World

# Run app.py when the container launches
CMD ["python", "app.py"]
requirements.txt
Flask
Redis
app.py
from flask import Flask
from redis import Redis, RedisError
import os
import socket

# Connect to Redis
redis = Redis(host="redis", db=0, socket_connect_timeout=2, socket_timeout=2)

app = Flask(__name__)

@app.route("/")
def hello():
    try:
        visits = redis.incr("counter")
    except RedisError:
        visits = "<i>cannot connect to Redis, counter disabled</i>"

    html = "<h3>Hello {name}!</h3>" \
           "<b>Hostname:</b> {hostname}<br/>" \
           "<b>Visits:</b> {visits}"
    return html.format(name=os.getenv("NAME", "world"), hostname=socket.gethostname(), visits=visits)

if __name__ == "__main__":
    app.run(host='0.0.0.0', port=80)
命令集合
Here is a list of the basic Docker commands from this page, and some related ones if you’d like to explore a bit before moving on.
docker build -t friendlyname .  # Create image using this directory's Dockerfile
docker run -p 4000:80 friendlyname  # Run "friendlyname" mapping port 4000 to 80
docker run -d -p 4000:80 friendlyname         # Same thing, but in detached mode
docker container ls                                # List all running containers
docker container ls -a             # List all containers, even those not running
docker container stop <hash>           # Gracefully stop the specified container
docker container kill <hash>         # Force shutdown of the specified container
docker container rm <hash>        # Remove specified container from this machine
docker container rm $(docker container ls -a -q)         # Remove all containers
docker image ls -a                             # List all images on this machine
docker image rm <image id>            # Remove specified image from this machine
docker image rm $(docker image ls -a -q)   # Remove all images from this machine
docker login             # Log in this CLI session using your Docker credentials
docker tag <image> username/repository:tag  # Tag <image> for upload to registry
docker push username/repository:tag            # Upload tagged image to registry
docker run username/repository:tag                   # Run image from a registry
Services
服务是分布式环境下的各种app。服务是生产环境下的容器。一个服务一个镜像image,并包括镜像运行的方法,包括端口、镜像数量。还有缩放的数量。使用yml文件来定义。
第一个 docker-compose.yml 文件
version: "3"
services:
  web:
    # replace username/repo:tag with your name and image details
    image: username/repository:tag
    deploy:
      replicas: 5
      resources:
        limits:
          cpus: "0.1"
          memory: 50M
      restart_policy:
        condition: on-failure
    ports:
      - "80:80"
    networks:
      - webnet
networks:
  webnet:
docker stack ls              # List all running applications on this Docker host
docker stack deploy -c <composefile> <appname>  # Run the specified Compose file
docker stack services <appname>       # List the services associated with an app
docker stack ps <appname>   # List the running containers associated with an app
docker stack rm <appname>                             # Tear down an application
网络
Docker通过网络驱动器来支持容器的网络。默认提供两个网络驱动: bridge 和 overlay 。
安装docker后自动带了三个网络
$ docker network ls

NETWORK ID          NAME                DRIVER
18a2866682b8        none                null
c288470c46f6        host                host
7b369448dccb        bridge              bridge
默认的容器是在bridge网络下。
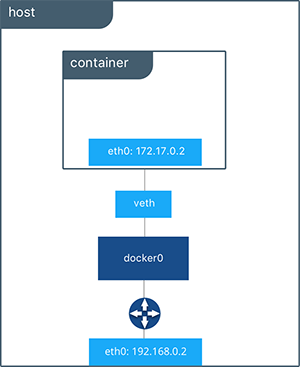
可以使用命令来查看容器的ip地址
$ docker network inspect bridge
同样可以使用命令将容器从网络移除
$ docker network disconnect bridge networktest
创建自己的bridge网络
$ docker network create -d bridge my_bridge
参数-d表示使用bridge驱动。
使用ls查看新建的网络,使用inspect检查网络,没有容易在该网络下。
通过定义网络可以隔离出独立的容器环境。在建立容器时,使用 –net=my_bridge 参数来指定容器的网络。
$ docker run -d --net=my_bridge --name db training/postgres

$ docker run -d --name web training/webapp python app.py
在my_bridge网络下建立db,在默认网络下建立web
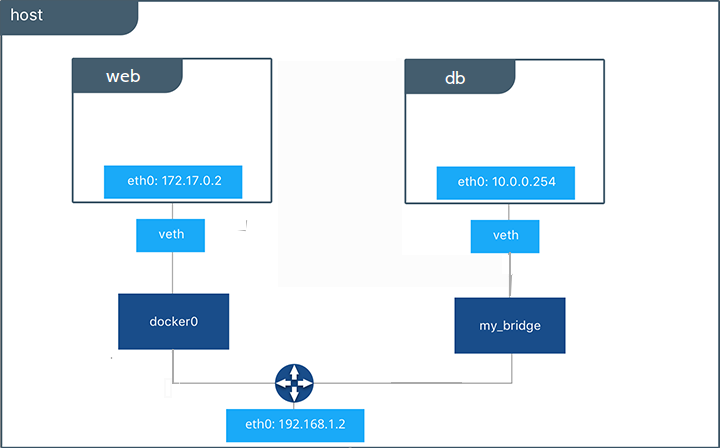
打开容器db的shell,运行ping命令,ping不通web
$ docker exec -it db bash

$ exit
但是docker允许在容器上附加多个网络。下面就将my_bridge附加到web容器上,这时候web和db都处于一个网络中了。
$ docker network connect my_bridge web
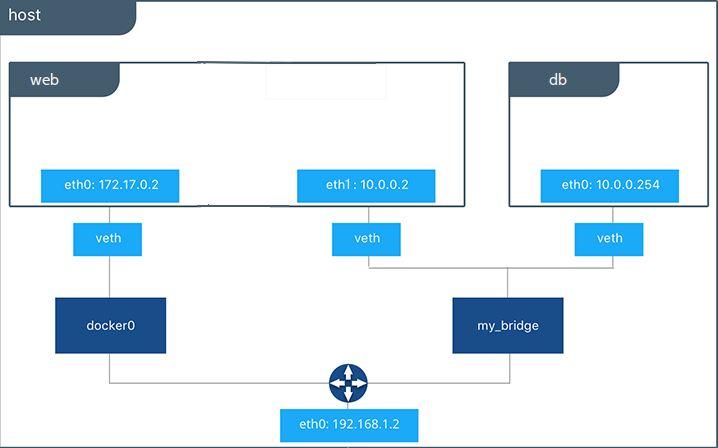
docker inspect –format=’’ web
Docker数据管理
直接在docker内部存取数据,有很多缺点。Docker提供了三种方式让容器可以直接挂载宿主机的volumes,bind mounts 和 tmpfs volumes。一般使用volumes。
选择合适的挂载方式
无论哪种方式,在容器内使用时都是一样的(文件夹或者文件),主要区别是在宿主机的位置。下面的图可以很直观的看到三者的差异:
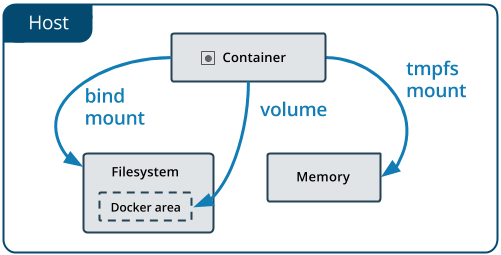
- Volumes 在宿主机的文件系统中,由Docker来管理(/var/lib/docker/volumes/),其他进程不应该修改这部分文件。
- Bind mounts 可以保存在宿主机的任意位置,所有进程都可以修改。
- tmpfs mounts 保存在宿主机系统内存中,不会写回宿主机文件。
更详细的说明
- Volumes:由Docker来创建和管理。使用命令直接创建,或者在容器或服务启动时创建。
docker volume create当创建一个volume时,实际是存储在宿主机的一个目录。当卷挂载到容器时,就是这个目录挂载上了。一个卷可以同时挂到多个容器。即使容器使用卷了,它也不会被自动移除。当然可以手工来用命令移除没有在使用的卷:
docker volume prune - Bind mounts:Docker最早支持的,相比较volumes有些功能上的限制。首先使用bind mounts需要使用宿主机的全路径。文件和文件夹可以由容器来创建。非常高效,但是依赖宿主机有特别的目录结构。如果是新的Docker应用,建议使用volumes。
*tmpfs mounts:不持久化,和容器一起被销毁。
在Docker17.06后,使用 –mount 来挂载。
##使用volumes的最佳实践
在Docker容器和服务中心,持久化数据优先选择volumes。
- 在多个运行的容器中共享数据。
- 宿主机的目录结构不能确定。
- 使用远程主机或者云存储。
- 需要做数据备份、迁移。
## 使用bind mounts的最佳实践
- 在宿主机和容器之间共享 配置 文件,如DNS文件。
- 共享开发环境的源代码或编译结果。例如容器中挂载Maven的target目录,每次宿主机编译,容器都可以得到最新的工件。但是生产环境还是拷贝编译结果。
- 宿主机的文件结构和容器要求的一致。
使用tmpfs mounts的最佳实践
- 不希望数据持久化。
开始使用Volumes
使用 -mount 参数来使用volumes
创建和管理volumes
#创建卷
docker volume create my-vol

#显示卷列表
docker volume ls

#查看卷
docker volume inspect my-vol

#删除卷
docker volumn rm my-vol